OpenTK - Camera 번역
Camera
In the previous tutorial we discussed the view matrix and how we can use the view matrix to move around the scene (we moved backwards a little). OpenGL by itself is not familiar with the concept of a camera, but we can try to simulate one by moving all objects in the scene in the reverse direction, giving the illusion that we are moving.
In this tutorial we'll discuss how we can set up a camera in OpenGL. We will discuss an FPS-style camera that allows you to freely move around in a 3D scene. In this tutorial we'll also discuss keyboard and mouse input and finish with a custom camera class.
지난 튜토리얼에서 view matrix에 대해 논의했고 씬 주변으로 움직이기 위해 view matrix를 어떻게 사용하는지 논의했다. OpenGL에서는 카메라의 개념이 익숙하지 않지만 Scene의 모든 물체를 반대방향으로 움직여서, 마치 카메라가 움직이는 것처럼 보였고 시뮬레이션했다.
이 튜토리얼에서는 OpenGL에서 카메라의 설정방법에 대해 논의할 것이다. 우리는 당신이 3D scene에서 자유롭게 움직이는 것이 가능한 FPS 스타일의 카메라를 논의할 것이다. 또한 이번 튜토리얼에서 키보드와 마우스의 입력을 논의하고 커스텀 카메라 Class를 완성할 것이다.
Camera/View space
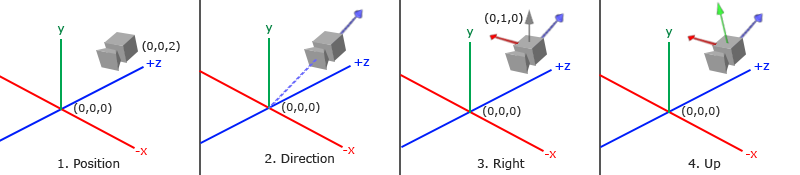
When we're talking about camera/view space we're talking about all the vertex coordinates as seen from the camera's perspective as the origin of the scene: the view matrix transforms all the world coordinates into view coordinates that are relative to the camera's position and direction. To define a camera we need its position in world space, the direction it's looking at, a vector pointing to the right and a vector pointing upwards from the camera. A careful reader might notice that we're actually going to create a coordinate system with 3 perpendicular unit axes with the camera's position as the origin.
카메라 뷰 공간은 Scene의 원점을 카메라의 관점에서 모든 좌표위치를 표현하는 것을 말한다. 이렇게 하기 위해서는 view matrix를 모든 좌표를 카메라의 위치와 방향에 상대적인 뷰 좌표로 변환해야 한다. 카메라를 정의하기 위해서는 world space에서의 카메라 위치와 카메라가 바라보는 방향, 카메라의 오른쪽 방향, 카메라의 위쪽 방향에 대한 Vector값이 필요하다. 사려 깊은 독자라면 카메라의 위치를 원점으로 하는 3개의 수직 단위 축으로 좌표계를 설정하려는 것을 알 수 있을 것이다.
1. Camera position
Getting a camera position is easy. The camera position is basically a vector in world space that points to the camera's position. We set the camera at the same position we've set the camera in the previous tutorial:
Vector3 Position = new Vector3(0.0f, 0.0f, 3.0f);
Don't forget that the positive z-axis is going through your screen towards you so if we want the camera to move backwards, we move along the positive z-axis.
카메라의 위치를 얻는 것은 쉽다. 카메라의 위치는 기본적으로 world space에서 Vector로 표현되는 카메라 위치다. 우리는 카메라의 위치를 설정하기 위해, 이전의 튜토리얼에서 정한 카메라의 위치와 동일한 위치를 설정할 것이다.
Z-axis의 양의 방향은 스크린을 뚫고 나오는 방향이다. 따라서 만약 카메라를 위로 옮기고 싶다면 카메라를 양의 Z-axis방향으로 움직여야 한다.
2. Camera direction
The next vector required is the camera's direction e.g. at what direction it is pointing at. For now we let the camera point to the origin of our scene: (0,0,0). Remember that if we subtract two vectors from each other we get a vector that's the difference of these two vectors? Subtracting the camera position vector from the scene's origin vector thus results in the direction vector. Since we know that the camera points towards the negative z direction we want the direction vector to point towards the camera's positive z-axis. If we switch the subtraction order around we now get a vector pointing towards the camera's positive z-axis:
Vector3 cameraTarget = Vector3.Zero;
Vector3 cameraDirection = Vector3.Normalize(cameraPos - cameraTarget);
The name direction vector is not the best chosen name, since it is actually pointing in the reverse direction of what it is targeting.
다음에 요구되는 벡터는 카메라의 방향으로 카메라가 응시하고 있는 것의 방향이다. 현재까지 우리는 카메라가 원점을 가리키도록 설정했다. 만약 두 벡터의 뺄셈을 하면 두 벡터의 차이를 구할 수 있다는 것을 기억하는가? 따라서 Scene의 원점 벡터에서 카메라 위치의 벡터 뺄셈은 카메라가 원점을 바라보는 방향벡터다. 우리는 카메라가 z-axis의 음의 방향을 향하고 있음을 알고 있으므로 , 카메라가 양의 z-axis로 향하도록 하기 위해 빼기 순서를 바꾸어 카메라가 양의 z-axis를 바라볼 수 있도록 한다.
사실상 방향벡터라는 이름은, 실제로 카메라의 방향이 반대의 방향을 가리키기 때문에 혼동을 줄 수 있다.
3. Right axis
The next vector that we need is a right vector that represents the positive x-axis of the camera space. To get the right vector we use a little trick by first specifying an up vector that points upwards (in world space). Then we do a cross product on the up vector and the direction vector from step 2. Since the result of a cross product is a vector perpendicular to both vectors, we will get a vector that points in the positive x-axis's direction (if we would switch the vectors we'd get a vector that points in the negative x-axis):
Vector3 up = Vector3.UnitY
Vector3 cameraRight = Vector3.Normalize(Vector3.Cross(up, cameraDirection));
다음 벡터는 카메라공간의 x-axis를 나타내는 우측벡터를 구한다. 우측 벡터를 구하기 위해 월드공간에서의 위 방향벡터를 이용한다. 두 벡터의 외적은 두 벡터에 서로 수직 하는 벡터를 만들어 내므로 2에서 구한 방향벡터와 월드공간의 위 방향벡터의 외적은 우측벡터와 같다. 주의할 것은 벡터 외적의 순서를 바꾸면 음의방향의 x-axis를 표현하므로 주의하자.
4. Up axis
Now that we have both the x-axis vector and the z-axis vector, retrieving the vector that points in the camera's positive y-axis is relatively easy: we take the cross product of the right and direction vector:
Vector3 cameraUp = Vector3.Cross(cameraDirection, cameraRight);
With the help of the cross product and a few tricks we were able to create all the vectors that form the view/camera space. For the more mathematically inclined readers, this process is known as the Gram-Schmidt process in linear algebra. Using these camera vectors we can now create a LookAt matrix that proves very useful for creating a camera.
이제 마지막으로 카메라 공간의 위 벡터를 구한다. 3. 에서 한 방법과 동일하게 카메라의 방향벡터와 우측벡터의 외적을 통해 구한다. 이러한 카메라 벡터의 사용으로 우리는 카메라 생성에 매우 유용한 LookAt matrix를 생성할 수 있다.
Look At
A great thing about matrices is that if you define a coordinate space using 3 perpendicular (or non-linear) axes you can create a matrix with those 3 axes plus a translation vector and you can transform any vector to that coordinate space by multiplying it with this matrix. This is exactly what the LookAt matrix does and now that we have 3 perpendiclar axes and a position vector to define the camera space we can create our own LookAt matrix:
행렬의 좋은 점은 3개의 수직 축을 사용하여 좌표공간을 정의하는 경우, 이 3개의 축과 변환벡터를 사용하여 행렬을 만들 수 있고, 벡터를 다음과 같이 곱하여 해당 좌표공간으로 이 매트릭스를 변환할 수 있다는 것이다. 이것이 LookAt matrix의 기능이다. 그리고 우리는 카메라 공간을 정의하기 위한 LookAt matrix를 정의하기 위한 3개의 축과 카메라 위치 벡터를 알고 있다.

Where R is the right vector, U is the up vector, D is the direction vector and P is the camera's position vector. Note that the position vector is inverted since we eventually want to translate the world in the opposite direction of where we want to move. Using this LookAt matrix as our view matrix effectively transforms all the world coordinates to the view space we just defined. The LookAt matrix then does exactly what it says: it creates a view matrix that looks at a given target.
Luckily for us, OpenTK already does all this work for us. We only have to specify a camera position, a target position and a vector that represents the up vector in world space (the up vector we used for calculating the right vector). OpenTK then creates the LookAt matrix that we can use as our view matrix:
위 행렬에서 R은 우측벡터이며 U는 위쪽방향벡터이고, D는 방향벡터이다. P는 카메라의 위치다.
Matrix4 view = Matrix4.LookAt(new Vector3(0.0f, 0.0f, 3.0f),
  		   new Vector3(0.0f, 0.0f, 0.0f),
  		   new Vector3(0.0f, 1.0f, 0.0f));
The Matrix4.LookAt function requires a position, target and up vector respectively. This creates a view matrix that is the same as the one used in the previous tutorial.
LookAt 함수는 카메라의 위치와 목표의 위치, 그리고 위쪽 벡터를 각각 요구한다.